Monday, September 26, 2016

VMRC Console has Disconnected


Symptoms

  • Attempting to connect to a virtual machine console fails.
  • The VMRC session opens with the vSphere Web Client, but not with the vSphere Client.
  • You see the error :

    Error: The VMRC Console has Disconnected.. Attempting to reconnect

Cause

This issue occurs due to an Application Control software such as antivirus software that blocks certain applications or functions of installed software on client/server systems.

Note: Access to Web GUI of the security server or hosted portal is important to disable certain settings depending on antivirus architecture.

Resolution

To resolve this issue, use one of these options:
  • Disable application control for virtual applications through the antivirus software.
  • Uninstall and reinstall the vSphere Client.
  • Stop the vmware-vmrc.exe*32 service from Windows Task Manager and log in again.

Friday, September 23, 2016

Powering off a virtual machine on an ESXi host fails

Determining the virtual machine's location

Determine the host on which the virtual machine is running. This information is available in the virtual machine's Summary tab in VI Client. Subsequent commands will be performed on, or remotely reference, the ESXi host where the virtual machine is running.

Using the ESXi esxcli command to power off a virtual machine

The esxcli command can be used locally or remotely to power off a virtual machine running on ESXi 5.x or later.
  1. Open a console session where the esxcli tool is available, either in the ESXi Shell, the vSphere Management Assistant (vMA), or the location where the vSphere Command-Line Interface (vCLI) is installed.
  2. Get a list of running virtual machines, identified by World ID, UUID, Display Name, and path to the .vmx configuration file by running this command:

    esxcli vm process list

  3. Power off one of the virtual machines from the list by running this command:

    esxcli vm process kill --type= [soft,hard,force] --world-id= WorldNumber

    Notes:
    Three power-off methods are available. Soft is the most graceful, hard performs an immediate shutdown, and force should be used as a last resort.

    Alternate power off command syntax is: esxcli vm process kill -t [ soft,hard,force] -w WorldNumber
  4. Repeat Step 2 and validate that the virtual machine is no longer running.
For ESXi 4.1:
  1. Get a list of running virtual machines, identified by World ID, UUID, Display Name, and path to the .vmx configuration file by running this command:

    esxcli vms vm list

  2. Power off one of the virtual machines from the list by running this command:

    esxcli vms vm kill --type= [soft,hard,force] --world-id= WorldNumber

Using the ESXi command-line utility vim-cmd to power off the virtual machine

  1. On the ESXi console, enter Tech Support mode and log in as root.
  2. Get a list of all registered virtual machines, identified by their VMID, Display Name, and path to the .vmx configuration file by running this command:

    vim-cmd vmsvc/getallvms

  3. Get the current state of a virtual machine by running this command:

    vim-cmd vmsvc/power.getstate VMID

  4. Shutdown the virtual machine using the VMID found in Step 2 and run this command:

    vim-cmd vmsvc/power.shutdown VMID

    Note: If the virtual machine fails to shut down, run this command:

    vim-cmd vmsvc/power.off VMID

Sending signals on ESXi to power off the virtual machine

A virtual machine can be halted from the command line by sending signals to the process.

Warning: This procedure is potentially hazardous to the ESXi host. If you do not identify the appropriate process ID (PID) and kill the wrong process, it may have unexpected results. If you are not comfortable with the following procedure, file a support request with VMware Technical Support and note this Knowledge Base article ID (1014165) in the problem description.

In ESXi 3.5 and above, you can use the kill command to send a signal to, and terminate, a running virtual machine process.
  1. On the ESXi console, enter Tech Support mode and log in as root.
  2. Determine if the virtual machine process is running on the ESXi host by running this command:

    ps | grep vmx

    The output appears similar to:

    7662 7662 vmx /bin/vmx
    7667 7662 vmx /bin/vmx
    7668 7662 mks:VirtualMachineName /bin/vmx
    7669 7662 vcpu-0:VirtualMachineName /bin/vmx


    Several rows are returned, one for each vmx process. Identify the parent vmx process for the target virtual machine. The first column contains the PID, and the second contains the parent's PID. Ensure you terminate only the parent process. The parent Process ID (PID) for each process is listed in the second column, identified in this example in bold. Take note of this number for use in the following steps.

    Caution: Ensure that you identify the line specific only to the virtual machine you are attempting to repair. If you continue this process for a virtual machine other than the one in question, you can cause downtime for the other virtual machine.

  3. If the vmx process is listed, terminate the process by running this command:

    kill ProcessID

  4. Wait 30 seconds and repeat step 2 to check for the process again.
  5. If it is not terminated, run this command:

    kill -9 ProcessID

  6. Wait 30 seconds and check for the process again.
In ESXi 4.x and above, you can use the k command in esxtop to send a signal to, and kill, a running virtual machine process.
  1. On the ESXi console, enter Tech Support mode and log in as root.
  2. Run the esxtop utility by running this command:

    esxtop

  3. Press c to switch to the CPU resource utilization screen.
  4. Press Shift+v to limit the view to virtual machines. This may make it easier to find the Leader World ID in step 7.
  5. Press f to display the list of fields.
  6. Press c to add the column for the Leader World ID.
  7. Identify the target virtual machine by its Name and Leader World ID (LWID).
  8. Press k.
  9. At the World to kill prompt, type in the Leader World ID from step 6 and press Enter.
  10. Wait 30 seconds and validate that the process is not longer listed.
Note:  If the above procedures did not resolve the issue and the ESX\ESXi host is responsive, it may need to be rebooted to put the virtual machine in a powered off state.

Additional Information

If a virtual machine cannot be powered off using any of these methods, it usually indicates a problem with the underlying infrastructure, such as the ESXi host or its backing hardware.

If a problem is suspected with the ESXi host that is preventing the shutdown of virtual machines, vMotion all unaffected virtual machines off the host, and force the host to halt with a purple diagnostic screen

Thursday, September 22, 2016

How to – kill / power off a virtual machine using esxcli command

If you want to power off or kill a virtual machine running on an ESXi host you can do this using the following esxcli command:
  • connect a console to your ESXi host (eg. SSH or ESXi Shell)
To get a list of all VMs running on the host use this command:
esxcli vm process list
The list contains: World ID, Process ID, VMX Cartel ID, UUID, display name and the path to the vmx config file:
kill_vm
To kill / power off the virtual machine use the following command:
esxcli vm process kill -type=xxxx – world-id=yyyyy
for -type=xxxx use: soft, hard or force
for world-id=yyyy use the World ID listed in the command above (eg. World ID 39731 for the example VM “Cold”)
Some information about the three possible shutdown methods:
soft = prefer this if you want to shut down “softly”
hard = equal to an immediate shutdown
force = hard kill of the VM


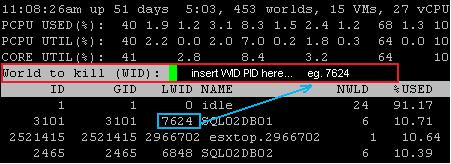
How to – kill a running virtual machine process with ESXTOP


Sometimes it is necessary to kill a running virtual machine process (eg. if there is locked file).
Of course you can do this with the kill command: “kill -9 PID” …or you can do it in ESXTOP!
.) run ESXTOP
.) press “c” to open the CPU view
.) press “f” to add/remove fields
.) press “c” to add the field LWID Leader World Id (World Group ID)
.) press “k” to open the kill prompt:

.) type in the LWID from the target virtual machine
.) ENTER
.) wait 30 seconds and take care that the process is no longer listed


Tuesday, September 20, 2016

Esxi Loading ipmi_si_drv issue fix

Here is what you need to do:
Step 1: Restart your machine. Its always good to go for the ‘when-nothing-works-try-this’ solution
Step 2: Be very quick and sharp about this step as it needs to be done in matter of seconds.
The moment you see a black screen with progress bar saying LOADING HYPERVISOR , enter SHIFT + o (the letter, not the number)  instantly.
`shift + o’ is a directive to boot options of ESXi hypervisor.
Step 3: Now that you are on an interactive boot shell of ESXi, enter this command :
> noipmiEnabled
That will tell ESXi boot not to load ipmi drivers for next reboot.
* Careful, this you will need to do at every reboot of your machine
Step 4: now hit enter and and let it go through the booting process.
Step 5: watch without any panic , the ESXi now should load all modules except ipmi and there you are at login screen.


Second Method:-

First try setting IPMI to Shared in BIOS, if the option is available. When booting your installation media, press Shift O to display the boot arguments and add noipmiEnabled to the boot arguments. Remember to do the same once the installation/upgrade is complete. Manually turn off or remove the module by turning the option VMkernel.Boot.ipmiEnabled off in vSphere or using the commands below:
# Do a dry run first:
esxcli software vib remove –dry-run –vibname ipmi-ipmi-si-drv
# Remove the module:
esxcli software vib remove –vibname ipmi-ipmi-si-drv
or try the following command in an unsupported shell connection:
esxcfg-module -d ipmi_si_drv
This disables the module although it still gets loaded.
Use a -l argument to see what modules are enabled/loaded and check that your desired one is disabled. This appears to be persistent across a reboot.

Wednesday, September 7, 2016

Memory Dump

Windows can create several different types of memory dumps. You can access this setting by opening the Control Panel, clicking System and Security, and clicking System. Click Advanced system settings in the sidebar, click the Advanced tab, and click Settings under Startup and recovery.
By default, the setting under Write debugging information is set to “Automatic memory dump.” Here’s what each type of memory dump actually is:
Complete memory dump: A complete memory dump is the largest type of possible memory dump. This contains a copy of all the data used by Windows in physical memory. So, if you have 16 GB of RAM and Windows is using 8 GB of it at the time of the system crash, the memory dump will be 8 GB in size. Crashes are usually caused by code running in kernel-mode, so the complete information including each program’s memory is rarely useful — a kernel memory dump will usually be sufficient even for a developer.
Kernel memory dump: A kernel memory dump will be much smaller than a complete memory dump. Microsoft says it will typically be about one-third the size of the physical memory installed on the system.

Small memory dump (256 kb): A small memory dump is the smallest type of memory dump. It contains very little information — the blue-screen information, a list of loaded drivers, process information, and a bit of kernel information. It can be helpful for identifying the error, but offers less detailed debugging information than a kernel memory dump.

Automatic memory dump: This is the default option, and it contains the exact same information as a kernel memory dump. Microsoft says that, when the page file is set to a system-managed size and the computer is configured for automatic memory dumps, “Windows sets the size of the paging file large enough to ensure that a kernel memory dump can be captured most of the time.” As Microsoft points out, crash dumps are an important consideration when deciding what size the page file should be. The page file must be large enough to contain the memory data.

(none): Windows won’t create memory dumps when it crashes.
choose-memory-dump-under-write-debugging-information

Memory Dumps Are For Developers

These dump files exist to provide you with information about the cause of the system crash. If you’re a Windows developer working on hardware drivers, the information in these memory dump files could help you identify the reason your hardware drivers are causing a computer to blue-screen and fix the problem.
But you’re probably just a normal Windows user, not someone developing hardware drivers or working on the Windows source code at Microsoft. Crash dumps are still useful. You might not need them yourself, but you may need to send them to a developer if you’re experiencing a problem with low-level software or hardware drivers on your computer. For example, Symantec’s website says that “Many times Symantec Development will need a Full Memory Dump from an affected system to identify the cause of the crash.” The crash dump may also be useful if you’re experiencing a problem with Windows itself, as you may need to send it to Microsoft. The developers in charge of the software can use the memory dump to see exactly what was going on on your computer at the time of the crash, hopefully allowing them to pin down and fix the problem.

Minidumps vs. Memory Dumps

Minidump files are useful to pretty much everyone because they contain basic information like the error message associated with a blue-screen of death. They’re stored in the C:\Windows\Minidump folder by default. Both types of dump files have the file extension .dmp.
Even when your system is configured to create an kernel, complete, or automatic memory dump, you’ll get both a minidump and a larger MEMORY.DMP file.
windows-minidumps
Tools like Nirsoft’s BlueScreenView can display the information contained in these minidmp files. You can see the exact driver files involved in a crash, which can help identify the cause of the problem. Because minidumps are so useful and small, we recommend never setting the memory dump setting to “(none)” — be sure to at least configure your system to create small memory dumps. They won’t use much space and will help you if you ever run into a problem. Even if you don’t know how to get information out of the minidump file yourself, you can find software tools and people who can use the information here to help pin down and fix your system problem.
nirsoft-bluescreenview
Larger memory dumps like kernel memory dumps and complete memory dumps are stored at C:\Windows\MEMORY.DMP by default. Windows is configured to overwrite this file each time a new memory dump it created, so you should only have one MEMORY.DMP file taking up space.
While even average Windows users can use minidumps to understand the cause of blue-screens, the MEMORY.DMP file is used more rarely and isn’t useful unless you plan on sending it to a developer. You probably won’t need to use the debugging information in a MEMORY.DMP file to identify and fix a problem on your own.
memory.dmp-file

Monday, September 5, 2016

Unmounting a LUN using the command line


Unmounting a LUN using the command line

To unmount a LUN from an ESXi 5.x/6.0 host using the command line:
  1. If the LUN is an RDM, skip to step 4. Otherwise, to obtain a list of all datastores mounted to an ESXi host, run this command:

    # esxcli storage filesystem list

    You see output, which lists all VMFS datastores, similar to:

    Mount Point Volume Name UUID Mounted Type Size Free
    ------------------------------------------------- ----------- ----------------------------------- ------- ------ ----------- -----------
    /vmfs/volumes/4de4cb24-4cff750f-85f5-0019b9f1ecf6 datastore1 4de4cb24-4cff750f-85f5-0019b9f1ecf6 true VMFS-5 140660178944 94577360896
    /vmfs/volumes/4c5fbff6-f4069088-af4f-0019b9f1ecf4 Storage2 4c5fbff6-f4069088-af4f-0019b9f1ecf4 true VMFS-3 146028888064 7968129024
    /vmfs/volumes/4c5fc023-ea0d4203-8517-0019b9f1ecf4 Storage4 4c5fc023-ea0d4203-8517-0019b9f1ecf4 true VMFS-3 146028888064 121057050624
    /vmfs/volumes/4e414917-a8d75514-6bae-0019b9f1ecf4 LUN01 4e414917-a8d75514-6bae-0019b9f1ecf4 true VMFS-5 146028888064 4266131456


  2. To find the unique identifier of the LUN housing the datastore to be removed, run this command:

    # esxcfg-scsidevs -m

    This command generates a list of VMFS datastore volumes and their related unique identifiers. Make a note of the unique identifier (NAA_ID) for the datastore you want to unmount as this will be used later on.

    For more information on the esxcfg-scsidevs command, see Identifying disks when working with VMware ESX/ESXi (1014953).

  3. Unmount the datastore by running this command:

    # esxcli storage filesystem unmount [-u UUID | -l label | -p path ]

    For example, use one of these commands to unmount the LUN01 datastore:

    # esxcli storage filesystem unmount -l LUN01
    # esxcli storage filesystem unmount -u 4e414917-a8d75514-6bae-0019b9f1ecf4
    # esxcli storage filesystem unmount -p /vmfs/volumes/4e414917-a8d75514-6bae-0019b9f1ecf4


    Note: If the VMFS filesystem you are attempting to unmount has active I/O or has not fulfilled the prerequisites to unmount the VMFS datastore, you see an error in the VMkernel logs similar to:

    WARNING: VC: 637: unmounting opened volume ('4e414917-a8d75514-6bae-0019b9f1ecf4' 'LUN01') is not allowed.
    VC: 802: Unmount VMFS volume f530 28 2 4e414917a8d7551419006bae f4ecf19b 4 1 0 0 0 0 0 : Busy


  4. To verify that the datastore is unmounted, run this command:

    # esxcli storage filesystem list

    You see output similar to:

    Mount Point Volume Name UUID Mounted Type Size Free
    ------------------------------------------------- ----------- ----------------------------------- ------- ------ ----------- -----------
    /vmfs/volumes/4de4cb24-4cff750f-85f5-0019b9f1ecf6 datastore1 4de4cb24-4cff750f-85f5-0019b9f1ecf6 true VMFS-5 140660178944 94577360896
    /vmfs/volumes/4c5fbff6-f4069088-af4f-0019b9f1ecf4 Storage2 4c5fbff6-f4069088-af4f-0019b9f1ecf4 true VMFS-3 146028888064 7968129024
    /vmfs/volumes/4c5fc023-ea0d4203-8517-0019b9f1ecf4 Storage4 4c5fc023-ea0d4203-8517-0019b9f1ecf4 true VMFS-3 146028888064 121057050624
    LUN01 4e414917-a8d75514-6bae-0019b9f1ecf4 false VMFS-unknown version 0 0


    The Mounted field is set to false, the Type field is set to VMFS-unknown version, and that no Mount Point exists.

    Note: The unmounted state of the VMFS datastore persists across reboots. This is the default behavior. If you need to unmount a datastore temporarily, you can do so by appending the --no-persist flag to the unmount command.

  5. To detach the device/LUN, run this command:

    # esxcli storage core device set --state=off -d NAA_ID

  6. To verify that the device is offline, run this command:

    # esxcli storage core device list -d NAA_ID

    You see output, which shows that the Status of the disk is off, similar to:

    naa.60a98000572d54724a34655733506751
    Display Name: NETAPP Fibre Channel Disk (naa.60a98000572d54724a34655733506751)
    Has Settable Display Name: true
    Size: 1048593
    Device Type: Direct-Access
    Multipath Plugin: NMP
    Devfs Path: /vmfs/devices/disks/naa.60a98000572d54724a34655733506751
    Vendor: NETAPP
    Model: LUN
    Revision: 7330
    SCSI Level: 4
    Is Pseudo: false
    Status: off
    Is RDM Capable: true
    Is Local: false
    Is Removable: false
    Is SSD: false
    Is Offline: false
    Is Perennially Reserved: false
    Thin Provisioning Status: yes
    Attached Filters:
    VAAI Status: unknown
    Other UIDs: vml.020000000060a98000572d54724a346557335067514c554e202020


    Running the partedUtil getptbl command on the device shows that the device is not found.

    For example:

    # partedUtil getptbl /vmfs/devices/disks/naa.60a98000572d54724a34655733506751

    Error: Could not stat device /vmfs/devices/disks/naa.60a98000572d54724a34655733506751 - No such file or directory.
    Unable to get device /vmfs/devices/disks/naa.60a98000572d54724a34655733506751


  7. If the device is to be permanently decommissioned, it is now possible to unpresent the LUN from the SAN. For more information, contact your storage team, storage administrator, or storage array vendor.
  8. To rescan all devices on the ESXi host, run this command:

    # esxcli storage core adapter rescan [ -A vmhba# | --all ]

    The devices are automatically removed from the Storage Adapters.

    Notes:
    • A rescan must be run on all hosts that had visibility to the removed LUN.
    • When the device is detached, it stays in an unmounted state even if the device is re-presented (that is, the detached state is persistent). To bring the device back online, the device must be attached. To do this via the command line, run this command:

      # esxcli storage core device set --state=on -d NAA_ID

  9. If the device is to be permanently decommissioned from an ESXi host, (that is, the LUN has been or will be destroyed), remove the NAA entries from the host configuration by running these commands:

    1. To list the permanently detached devices:

      # esxcli storage core device detached list

      You see output similar to:

      Device UID State
      ---------------------------- -----
      naa.50060160c46036df50060160c46036df off
      naa.6006016094602800c8e3e1c5d3c8e011 off


    2. To permanently remove the device configuration information from the system:

      # esxcli storage core device detached remove -d NAA_ID

      For example:

      # esxcli storage core device detached remove -d naa.50060160c46036df50060160c46036df

    The reference to the device configuration is permanently removed from the ESXi host's configuration.

    Note: If the device is detached but still presented (step 7 was skipped), the preceding command fails to permanently remove the device from the system, and the device is automatically re-attached. You must complete step 7 for the device to be permanently removed.

Automating detaching datastores using PowerCLI and the vSphere SDK for Perl

It is possible to automate the process of detaching datastores from multiple hosts using PowerCLI scripts.

Using the PowerCLI

To detach a storage device using PowerCLI:
  1. Review the VMware Contributed Sample Code disclaimer.
  2. Download the PowerCLI script available at Automating Datastore/Storage Device Detachment in vSphere 5.

    Note: This PowerCLI script is provided as-is and is accordingly community supported. If you experience issues with this PowerCLI script, seek assistance from the VMware Communities forums.

  3. Import the script using this command:

    Import-Module path_to_script

  4. Ensure that you have already unmounted the target datastore. For more information, see the Unmount VMFS or NFS Datastores section in the vSphere 5.0 Storage Guide.
  5. List all datastores and their attached hosts by running this command:

    Get-Datastore | Get-DatastoreMountInfo | Sort Datastore, VMHost | FT –AutoSize

    You see output similar to:

    Datastore VMHost Lun Mounted State
    --------- ------ --- ------- -----
    IX2ISCSI01 esx01.vmw.local naa.5000144f52145699 False Attached
    IX2ISCSI01 esx02.vmw.local naa.5000144f52145699 False Attached
    IX2ISCSI01 esx03.vmw.local naa.5000144f52145699 False Attached
    LocalDatastore esx01.vmw.local mpx.vmhba1:C0:T0:L0 True Attached
    LocalDatastore esx02.vmw.local mpx.vmhba1:C0:T0:L0 True Attached
    esx04-Internal-150GB esx04.vmw.local t10.ATA_____GB0160EAPRR_____________________________WCAT25563003________ True Attached
    esx04-Internal-500GB esx04.vmw.local t10.ATA_____WDC_WD5000AAKS2D00V1A0________________________WD2DWMAWF0069467 True Attached
    esx03-Internal-150GB esx03.vmw.local t10.ATA_____GB0160EAPRR_____________________________WCAT25704089________ True Attached
    esx03-Internal-500GB esx03.vmw.local t10.ATA_____WDC_WD5000AAKS2D00YGA0________________________WD2DWCAS85034601 True Attached


  6. Select the appropriate datastore and record the name beneath the Datastore column, and confirm that the Mounted column contains the value False for all hosts.
  7. Detach the devices from all hosts by running this command:

    Get-Datastore datastore_name| Detach-Datastore

    Where datastore_name is the name of the datastore recorded in step 3.

    You see output similar to:

    Detaching LUN naa.5000144f52145699 from host esx01.vmw.local...
    Detaching LUN naa.5000144f52145699 from host esx02.vmw.local...
    Detaching LUN naa.5000144f52145699 from host esx03.vmw.local...
Note: The powercli command Get-Datastore datastore_name| Detach-Datastore is detaching only the head extent (first extent) of the datastore which is made up of multiple extents. This step does not work for the datastore which has multiextents.

Using the vSphere SDK for Perl

To detach a storage device using Perl:
  1. Review the VMware Contributed Sample Code disclaimer.
  2. Deploy the community-supported Perl script available in the VMware vSphere Blog, Automating Datastore/Storage Device Detachment in vSphere 5.

    Caution: Before proceeding, ensure that you have already unmounted the target datastore. For more information, see the Unmount VMFS or NFS Datastores section in the vSphere 5.0 Storage Guide.

  3. List all datastores and their attached hosts by running this command:

    ./lunManagement.pl --server vcenter_ip --username user --operation list

    Where vcenter_ip is the IP address of the vCenter Server managing your hosts and user is a user with administrative privileges.

  4. You are prompted for a password for the user account used in step 3. If the correct password is entered, the script generates output similar to:

    Datastore: esx01-local-storage-1 LUN: mpx.vmhba1:C0:T0:L0
    esx01.vmw.local MOUNTED ATTACHED
    Datastore: esx02-local-storage-1 LUN: mpx.vmhba1:C0:T0:L0
    esx02.vmw.local MOUNTED ATTACHED
    Datastore: iSCSI-1 LUN: naa.600144f0a33bc20000004e9772510001
    esx01.vmw.local UNMOUNTED ATTACHED
    esx02.vmw.local UNMOUNTED ATTACHED
    Datastore: iSCSI-2 LUN: naa.600144f0a33bc20000004e9772ee0002
    esx01.vmw.local MOUNTED ATTACHED
    esx02.vmw.local MOUNTED ATTACHED
    Datastore: iSCSI-3 LUN: naa.600144f0a33bc20000004e9773560003
    esx01.vmw.local MOUNTED ATTACHED
    esx02.vmw.local MOUNTED ATTACHED
    Datastore: iSCSI-4 LUN: naa.600144f0a33bc20000004e9773560004
    esx01.vmw.local MOUNTED ATTACHED
    esx02.vmw.local MOUNTED ATTACHED
    Datastore: iSCSI-5 LUN: naa.600144f0a33bc20000004e9773570005
    esx01.vmw.local MOUNTED ATTACHED
    esx02.vmw.local MOUNTED ATTACHED


  5. Confirm that the datastore that you want to detach has been unmounted by checking the UNMOUNTED keyword beneath the applicable datastore name and NAA value.
  6. Detach the device across multiple hosts by running this command:

    ./lunManagement.pl --server vcenter_ip --username user --operation detach --datastore datastore

    Where vcenter_ip is the IP address for the vCenter Server, user is a user with administrative privileges, and datastore is the name of the datastore identified in step 4.

  7. You are prompted for a password and confirmation that you want to do the operation. After providing the correct password and acknowledging the warning, the tool generates output similar to:

    Detaching LUN "0200000000600144f0a33bc20000004e9772510001434f4d535441" from Host "esx01.vmw.local" ...
    Successfully detached LUN!
    Detaching LUN "0200000000600144f0a33bc20000004e9772510001434f4d535441" from Host "esx02.vmw.local" ...
    Successfully detached LUN!
Note: After detaching the LUN, it can be unpresented from the storage. However, if you run the esxcli storage core device detached remove -d NAA_ID command to permanently decommission the LUN from the ESXI host before unpresenting the LUN from the storage, the LUN gets reattached to the host and must be detached again.

Obtaining the NAA ID of the LUN

From the vSphere Client, this information is visible in the Properties window of the datastore.

From the ESXi host, run this command:

# esxcli storage vmfs extent list

You see output similar to:

Volume Name VMFS UUID Extent Number Device Name Partition
----------- ----------------------------------- ------------- ------------------------------------ ---------
datastore1 4de4cb24-4cff750f-85f5-0019b9f1ecf6 0 naa.6001c230d8abfe000ff76c198ddbc13e 3
Storage2 4c5fbff6-f4069088-af4f-0019b9f1ecf4 0 naa.6001c230d8abfe000ff76c2e7384fc9a 1
Storage4 4c5fc023-ea0d4203-8517-0019b9f1ecf4 0 naa.6001c230d8abfe000ff76c51486715db 1
LUN01 4e414917-a8d75514-6bae-0019b9f1ecf4 0 naa.60a98000572d54724a34655733506751 1


Make a note of the NAA ID of the datastore to use this information later in this procedure.

Note: Alternatively, you can run the esxcli storage filesystem list command, which lists all file systems recognized by the ESXi host.

Recreating a missing virtual machine disk descriptor file

Details

This article provides steps to recreate a lost virtual disk descriptor file (VMDK). You may need to recreate missing header/descriptor files if:
  • The virtual machine disk file listed in the Datastore Browser is your virtual machine's flat file, and does not have an icon.
  • When powering on a virtual machine, you see a File not found error.
  • The flat file exists when viewing the virtual machine's directory through the terminal, VMware vSphere Management Assistant (vMA), or VMware Command-Line Interface (vCLI).
  • The disk descriptor file for the virtual machine's disk does not exist or is corrupted.

    Note: For additional symptoms and log entries, see the Additional Information section.

Solution

Note: Command-line methods, such as the one covered in this video, are available for ESXi 6.0, 5.x, 4.1, and earlier.


Overview steps

Note: VMware recommends to attempt to restore the missing descriptor file from backups if possible. If this is not possible, proceed with recreating the virtual machine disk descriptor file.

To create a virtual machine disk descriptor file:
  1. Identify the size of the flat file in bytes.
  2. Create a new blank virtual disk that is the same size as the original. This serves as a baseline example that is modified in later steps.

    Note: This step is critical to assure proper disk geometry.

  3. Rename the descriptor file (also referred to as a header file) of the newly-created disk to match the name of the original virtual disk.
  4. Modify the contents of the renamed descriptor file to reference the flat file.
  5. Remove the leftover temporary flat file of the newly-created disk, as it is not required.
Note: This procedure will not work on virtual disks configured with a Para-virtualized SCSI controller in the virtual machine as the virtual machine may not boot. However, there are reports that if the Para-virtualized SCSI controller is used, the new descriptor file can also be updated with ddb.adapterType = pvscsi replacing ddb.adapterType = lsilogic in the descriptor file.

Detailed steps

To create a virtual machine disk:
  1. Log in to the terminal of the ESXi/ESX host
  2. Navigate to the directory that contains the virtual machine disk with the missing descriptor file using the command:

    # cd /vmfs/volumes/myvmfsvolume/mydir

    Notes:
    • If you are using a version of ESXi, you can access and modify files and directories using the vSphere Client Datastore Browser or the vifs utility included with the vSphere CLI. For more information, see the section Performing File System Operations in the vSphere Command-Line Interface Documentation.
    • If you are using VMware Fusion, the default location for the virtual machine files is the home/Documents/Virtual Machines.localized/virtual_machine/ folder, where home is your home folder, and virtual_machine is the name of the virtual machine.

  3. Identify the type of SCSI controller the virtual disk is using by examining the virtual machine configuration file (.vmx ). The controller is identified by the line scsi#.virtualDev , where # is the controller number. There may be more than one controller and controller type attached to the virtual machine, such as lsisas1068 (which is the LSILogic SAS controller), lsilogic , or buslogic . This example uses lsilogic :

    scsi0.present = "true"
    scsi0.sharedBus = "none"
    scsi1.present = "true"
    scsi1.sharedBus = "virtual"
    scsi1.virtualDev = "lsilogic"


  4. Identify and record the exact size of the -flat file using a command similar to:

    # ls -l vmdisk0-flat.vmdk

    -rw------- 1 root root 4294967296 Oct 11 12:30 vmdisk0-flat.vmdk


  5. Use the vmkfstools command to create a new virtual disk:

    # vmkfstools -c 4294967296 -a lsilogic -d thin temp.vmdk

    The command uses these flags:

    • -c size

      This is the size of the virtual disk.

    • -a virtual_controller

      Whether the virtual disk was configured to work with BusLogic, LSILogic (for both lsilogic and lsilogic SAS), Paravirtual, or IDE:
      Use lsilogic for virtual disk type "lsilogic" and "lsisas1068"

    • -d thin

      This creates the disk in thin-provisioned format.

    Note: To save disk space, we create the disk in thin-provisioned format using the type thin . The resulting flat file then consumes minimal amounts of space (1 MB) instead of immediately assuming the capacity specified with the -c switch. The only consequence, however, is the descriptor file contains an extra line that must be manually removed in a later step.

    The temp.vmdk and temp-flat.vmdk files are created as a result.

  6. Delete temp-flat.vmdk , as it is not needed. Run the command:

    # rm -i temp-flat.vmdk
  7. Rename temp.vmdk to the name that is required to match the orphaned .flat file (or vmdisk0.vmdk , in this example):

    # mv -i temp.vmdk vmdisk0.vmdk
  8. Edit the descriptor file using a text editor:

    1. Under the Extent Description section, change the name of the .flat file to match the orphaned .flat file you have.

    2. Find and remove the line ddb.thinProvisioned = "1" if the original .vmdk was not a thin disk. If it was, retain this line.

      # Disk DescriptorFile
      version=1
      CID=fb183c20
      parentCID=ffffffff
      createType="vmfs"

      # Extent description
      RW 8388608 VMFS "vmdisk0-flat.vmdk"

      # The Disk Data Base
      #DDB

      ddb.virtualHWVersion = "4"
      ddb.geometry.cylinders = "522"
      ddb.geometry.heads = "255"
      ddb.geometry.sectors = "63"
      ddb.adapterType = "lsilogic"
      ddb.thinProvisioned = "1"


      The virtual machine is now ready to power on. Verify your changes before starting the virtual machine.
  9. To check the disk chain for consistency, run this command against the disk descriptor file:

    For ESXi 6.0 and 5.x:

    # vmkfstools -e filename.vmdk

    For a complete chain, you see output similar to:
    Disk chain is consistent

    For a broken chain, you see a summary of the snapshot chain and then an output similar to:
    Disk chain is not consistent : The parent virtual disk has been modified since the child was created. The content ID of the parent virtual disk does not match the corresponding parent content ID in the child (18)
Additional Information
You experience these additional symptoms:
  • In the virtual machine's vmware.log file, you see entries similar to:
<YY-MM-DD>T
T
T
T
T
T
T
  • In the /var/log/hostd.log file of an ESXi 5.0 host, you see entries similar to:
T
c0986-14d88a26-416a-000c2988e4dd/myvm/myvm.vmx with error msg = "VMware ESX cannot find the virtual disk "myvm_2.vmdk". Verify the path is valid and try again.
--> Cannot open the disk 'myvm_2.vmdk' or one of the snapshot disks it depends on.
--> Reason: The system cannot find the file specified." and error code -57.
2011-07-13T17:59:48.705Z [74258B90 info 'Libs'] Vix: [3057 foundryVMMsgPost.c:1354]: Error VIX_E_FAIL in FoundryVMGetMsgPostError
(): Unknown error
...
T

    Note: The preceding log excerpts are only examples. Date, time, and environmental variables may vary depending on your environment.  

Each disk drive for a virtual machine consists of a pair of .vmdk files. One is a text file containing descriptive data about the virtual hard disk, and the second is the actual content of that disk. For example, a virtual machine named examplevm has one disk attached to it. This disk is comprised of a examplevm.vmdk descriptor file of under 1 KB, and a 10 GB examplevm-flat.vmdk flat file which contains virtual machine content.

“esxcli software vib” commands to patch an ESXi 5.x/6.x host


Purpose

This article outlines the procedure for installing patches on an ESXi 5.x/6.x host from the command line using esxcli software vib commands.

Resolution

To patch an ESXi 5.x/6.x host from the command line:

  1. Patches for VMware products can be obtained from the VMware patch portal. Select ESXi (Embedded and Installable) in the product dropdown and click Search.
  2. Click the Download link below the patch Release Name to download the patch to your system.
  3. Upload the patch to a datastore on your ESXi 5.x/6.x host using the Datastore Browser from vCenter Server or a direct connection to the ESXi 5.x/6.x host using the vSphere client.

    Note: VMware recommends creating a new directory on the datastore and uploading the patch file to this directory.

  4. Log in to the local Tech Support Mode console of the ESXi 5.x/6.x host. For more information, see Using Tech Support Mode in ESXi 4.1 and ESXi 5.x (1017910).
  5. Migrate or power off the virtual machines running on the host and put the host into maintenance mode. The host can be put into maintenance mode by running this command:

    # vim-cmd hostsvc/maintenance_mode_enter

  6. Navigate to the directory on the datastore where the patch file was uploaded to and verify that the file exists by running these commands:

    # cd /vmfs/volumes/Datastore/DirectoryName
    # ls


    Where Datastore is the datastore name where the patch file was uploaded to, and DirectoryName is the directory you created on the datastore.

  7. Install or update a patch on the host using these esxcli commands:

    Notes:

    • To install or update a .zip file, use the -d option. To install or update a .vib file use the -v option.
    • Using the update command is the recommended method for patch application. Using this command applies all of the newer contents in a patch, including all security fixes. Contents of the patch that are a lower revision than the existing packages on the system are not applied.
    • Using the install command overwrites the existing packages in the system with contents of the patch you are installing, including installing new packages and removing old packages. The install command may downgrade packages on the system and should be used with caution. If required, the install command can be used to downgrade a system (only for image profiles) when the --allow-downgrade flag is set.
    Caution: The install method has the possibility of overwriting existing drivers. If you are using third-party ESXi images, VMware recommends using the update method to prevent an unbootable state.
    To Install:

    • Using local setup:

      # esxcli software vib install -d "/vmfs/volumes/Datastore/DirectoryName/PatchName.zip"

      Where PatchName.zip is the name of the patch file you uploaded to the datastore.

      Note: Alternatively, you can use the datastore's UUID instead of the DirectoryName .

      For example:

      # esxcli software vib install -d "/vmfs/volumes/datastore1/patch-directory/ESXi500-201111001.zip"

      or

      # esxcli software vib install -d "/vmfs/volumes/a2bb3e7c-ca10571c-cec6-e5a60cc0e7d0/patch-directory/ESXi500-201111001.zip"

    • Using http setup:

      # esxcli software vib install -v viburl

      Where viburl is the URL to the http depot where VIB packages reside.

      For example:

      # esxcli software vib install -v https://hostupdate.vmware.com/software/VUM/PRODUCTION/main/esx/vmw/vib20/tools-light/VMware_locker_tools-light_5.0.0-0.7.515841.vib
    To Update:

    • Using local setup:

      # esxcli software vib update -d "/vmfs/volumes/Datastore/DirectoryName/PatchName.zip"

      Where PatchName.zip is the name of the patch file you uploaded to the datastore.

      Note: Alternatively, you can use the datastore's UUID instead of the DirectoryName .

      For example:

      # esxcli software vib update -d "/vmfs/volumes/datastore1/patch-directory/ESXi500-201111001.zip"

      or

      # esxcli software vib update -d "/vmfs/volumes/ a2bb3e7c-ca10571c-cec6-e5a60cc0e7d0 /patch-directory/ESXi500-201111001.zip"

    • Using http setup:

      # esxcli software vib update -v viburl

      Where viburl is the URL to the http depot where VIB packages reside.

      For example:

      # esxcli software vib update -v https://hostupdate.vmware.com/software/VUM/PRODUCTION/main/esx/vmw/vib20/tools-light/VMware_locker_tools-light_5.0.0-0.7.515841.vib
  8. Verify that the VIBs are installed on your ESXi host:

    # esxcli software vib list

    For example:

    # esxcli software vib list

    Name              Version                     Vendor Acceptance Level Install Date
    ----------------- --------------------------- ------ ---------------- ------------
    ata-pata-amd      0.3.10-3vmw.500.0.0.469512  VMware VMwareCertified  2012-05-04
    ata-pata-atiixp   0.4.6-3vmw.500.0.0.469512   VMware VMwareCertified  2012-05-04
    ata-pata-cmd64x   0.2.5-3vmw.500.0.0.469512   VMware VMwareCertified  2012-05-04
    ata-pata-hpt3x2n  0.3.4-3vmw.500.0.0.469512   VMware VMwareCertified  2012-05-04


  9. After the patch has been installed, reboot the ESX host:

    # reboot

  10. After the host has finished booting, exit maintenance mode and power on the virtual machines:

    # vim-cmd hostsvc/maintenance_mode_exit

Restarting the Management agents in ESXi

Symptoms

  • Cannot connect directly to the ESXi host or manage under vCenter server.
  • vCenter Server displays the error:

    Virtual machine creation may fail because agent is unable to retrieve VM creation options from the host

Purpose

For troubleshooting ESXi connectivity issue, restart the management agents on your ESXi host.
Warning: If LACP is configured on the VSAN network, do not restart management agents on ESXi hosts running Virtual SAN.
  • Restarting the management agents may impact any tasks that are running on the ESXi host at the time of the restart.
  • Check for any storage issues before restarting the Host deamon hostd service or services.sh

Resolution

Restart Management agents in ESXi Using Direct Console User Interface (DCUI):
  1. Connect to the console of your ESXi host.
  2. Press F2 to customize the system.
  3. Log in as root.
  4. Use the Up/Down arrows to navigate to Troubleshooting Options > Restart Management Agents.
  5. Press Enter.
  6. Press F11 to restart the services.
  7. When the service restarts, press Enter.
  8. Press Esc to log out.

Restart Management agents in ESXi Using ESXi Shell or Secure Shell (SSH):

  1. Log in to ESXi Shell or SSH as root.

  2. Restart the ESXi host daemon and vCenter Agent services using these commands:

    /etc/init.d/hostd restart

    /etc/init.d/vpxa restart
Note: In ESXi 4.x, run this command to restart the vpxa agent:

service vmware-vpxa restart

Alternatively:
 
  • To reset the management network on a specific VMkernel interface, by default vmk0, run the command:

    esxcli network ip interface set -e false -i vmk0; esxcli network ip interface set -e true -i vmk0

    Note: Using a semicolon (;) between the two commands ensures the VMkernel interface is disabled and then re-enabled in succession. If the management interface is not running on vmk0, change the above command according to the VMkernel interface used.

  • To restart all management agents on the host, run the command:

    services.sh restart
Caution:
  • If LACP is enabled and configured, do not restart management services using services.sh command. Instead restart independent services using the /etc/init.d/module restart command.
  • If the issue is not resolved, and you are restarting all the services that are a part of the services.sh script, take a downtime before proceeding to the script.

Determining Network/Storage firmware and driver version in ESXi/ESX 4.x, ESXi 5.x, and ESXi 6.x

Note: In ESXi 5.x, the swfw.sh command is supplied with the vm-support support bundle collection tool. The swfw.sh command can be used to identify the firmware and driver versions of hardware connected to the host. To run the command, use this path:

# /usr/lib/vmware/vm-support/bin/swfw.sh


Obtaining Host Bus adapter driver and firmware information

To determine the driver and firmware version of a Host Bus Adapter:
  • To determine the firmware version of a Host Bus Adapter, see Identifying the firmware of a Qlogic or Emulex FC HBA (1002413).
  • To obtain the driver version of a Host Bus Adapter on an ESXi/ESX host:

    1. Open a console to the ESXi/ESX host. For more information, see Unable to connect to an ESX host using Secure Shell (SSH) (1003807) or Using Tech Support Mode in ESXi 4.1 and ESXi 5.x (1017910).
    2. Run this command to obtain the driver type that the Host Bus Adapter is currently using:

      # esxcfg-scsidevs -a

      You see output similar to:

      vmhba0 ata_piix link-n/a ide.vmhba0 (0:7.1) Intel Corporation Virtual Machine Chipset
      vmhba1 mptspi link-n/a pscsi.vmhba1 (0:16.0) LSI Logic / Symbios Logic LSI Logic Parallel SCSI Controller
      vmhba32 ata_piix link-n/a ide.vmhba32 (0:7.1) Intel Corporation Virtual Machine Chipset


      Note: The second column shows the driver that is configured for the HBA.

    3. Run this command to view the driver version in use:

      # vmkload_mod -s HBADriver |grep Version

      For example, run this command to check the mptspi driver:

      # vmkload_mod -s mptspi |grep Version

      Version: Version 4.00.37.00.30vmw, Build: 721907, Interface: 9.0, Built on: May 18 2012


      In this example, the driver version is 4.00.37.00.30vmw.

      To obtain the driver version for all HBAs in the system with a single command, use:

      # for a in $(esxcfg-scsidevs -a |awk '{print $2}') ;do vmkload_mod -s $a |grep -i version ;done

    4. To determine the recommended driver for the card, we must obtain the Vendor ID (VID), Device ID (DID), Sub-Vendor ID (SVID), and Sub-Device ID (SDID) using the vmkchdev command:

      # vmkchdev -l |grep vmhba1

      000:16.0 1000:0030 15ad:1976 vmkernel vmhba1


      In this example, the values are:

      • VID = 1000
      • DID = 0030
      • SVID = 15ad
      • SDID = 1976

      To obtain vendor information for all HBAs in the system using a single command:

      # for a in $(esxcfg-scsidevs -a |awk '{print $1}') ;do vmkchdev -l |grep $a ;done

    5. Search the VMware Compatibility Guide for the Vendor ID (VID), Device ID (DID), Sub-Vendor ID (SVID), and Sub-Device ID (SDID). In some cases, you may need to do a text search to narrow down the particular card.

      Note: You can check the ESXi/ESX host version with the command:

      # vmware -v

Obtaining Network card driver and firmware information


To determine the version information for a physical network interface card in vSphere ESXi/ESX 4.x and 5.x:

  1. Open a console to the ESXi/ESX host. For more information, see Unable to connect to an ESX host using Secure Shell (SSH) (1003807) or Using Tech Support Mode in ESXi 4.1 and ESXi 5.x (1017910).
  2. Obtain a list of network interface cards and names.

    In ESXi/ESX 4.x, run this command:

    # esxcfg-nics -l

    For example:

    # esxcfg-nics -l
    Name PCI Driver Link Speed Duplex MAC Address
    vmnic0 00:02:04.00 ACME Up 1000Mbps Full 01:23:45:67:89:AB
    vmnic1 00:02:05.00 ACME Up 1000Mbps Full 01:23:45:67:78:AC


    In ESXi 5.x, run this command:

    # esxcli network nic list

  3. Run the ethtool -i command to display available information for one of the network interfaces, specifying its name from step 2:

    # ethtool -i VMNic_name

    For example:

    # ethtool -i vmnic0

    driver: ACME
    version: 1.2.3a-1vmw
    firmware-version: 7.8.9
    bus-info: 0000:02:04.00


    To obtain information from # ethtool -i for all network adapters at once, you can run this command:

    # for a in $(esxcfg-nics -l|awk '{print $1}'|grep [0-9]) ;do ethtool -i $a;done

    In ESXi 5.x, this command can also be used:

    # esxcli network nic get -n vmnic#


    Note: If the network card is using a native driver (ESXi 5.5 and later), the ethtool command is not compatible, you must use the esxcli network command set to acquire network adapter information.
  4. To determine the recommended driver for the card, we must obtain the Vendor ID (VID), Device ID (DID), Sub-Vendor ID (SVID), and Sub-Device ID (SDID) using the vmkchdev command:

    # vmkchdev -l |grep vmnic0

    002:01.0 8086:100f 15ad:0750 vmkernel vmnic0


    In this example, the values are:

    • VID = 8086
    • DID = 100f
    • SVID = 15ad
    • SDID = 0750

    Run this command to obtain vendor information for all NICs in the system using:

    # for a in $(esxcfg-nics -l |awk '{print $1}' |grep [0-9]) ;do vmkchdev -l |grep $a ;done

You can now search the VMware Compatibility Guide for the Vendor ID (VID), Device ID (DID), Sub-Vendor ID (SVID), and Sub-Device ID (SDID). In some cases, you may need to do a text search to narrow down the particular card.

Note: Check the ESXi/ESX host version by running this command:
# vmware -v

From both the ESXi/ESX version and the network type, you then know the version of the driver to use. Driver updates are available on the VMware downloads page. 

Additional Information

This script information is only for ESXi 5.x.
  • Run this command in ESXi 5.x to obtain the driver version for all HBAs in the system:

    esxcli storage core adapter list|awk '{print $1}'|grep [0-9]|while read a;do vmkload_mod -s $a|grep -i version;done
  • Run this command in ESXi 5.x to obtain vendor information for all HBAs in the system:

    esxcli storage core adapter list|awk '{print $1}'|grep [0-9]|while read a;do vmkchdev -l |grep $a ;done
  • Run this command in ESXi 5.x to obtain information from ethtool -i for all network adapters:

    esxcli network nic list | awk '{print $1}'|grep [0-9]|while read a;do ethtool -i $a;done
  • Run this command in ESXi 5.x to obtain vendor information for all NICs in the system:

    esxcli network nic list | awk '{print $1}'|grep [0-9]|while read a;do vmkchdev -l|grep $a;done
  • Run these commands to see the driver VIBs (vSphere Installation Bundle) actually installed on the host:
    • esxcli software vib list can be used to check the installed VIBs
    • esxcli software vib list | grep xxx will list a specific driver xxx 


Investigating virtual machine file locks on ESXi


Details


  • Powering on a virtual machine fails.
  • Unable to power on a virtual machine.
  • Adding an existing virtual machine disk (VMDK) to a virtual machine that is already powered on fails.
  • You see the error:

    Failed to add disk scsi0:1. Failed to power on scsi0:1

  • When powering on the virtual machine, you see one of these errors:

    • Unable to open Swap File
    • Unable to access a file since it is locked
    • Unable to access a file since it is locked
    • Unable to access Virtual machine configuration
  • In the /var/log/vmkernel log file, you see entries similar to:

    WARNING: World: VM xxxx: xxx: Failed to open swap file : Lock was not free
    WARNING: World: VM xxxx: xxx: Failed to initialize swap file


  • When opening a console to the virtual machine, you may receive the error:

    Error connecting to .vmx because the VMX is not started

  • Powering on the virtual machine results in the power on task remaining at 95% indefinitely.
  • Cannot power on the virtual machine after deploying it from a template.
  • The virtual machine reports conflicting power states between vCenter Server and the ESXi/ESX host console.
  • Attempting to view or open the .vmx file using a text editor (for example, cat or vi), reports an error similar to:

    cat: can't open '[name of vm].vmx': Invalid argument

    Solution

    The purpose of file locking


    To prevent concurrent changes to critical virtual machine files and file systems, ESXi/ESX hosts establish locks on these files. In certain circumstances, these locks may not be released when the virtual machine is powered off. The files cannot be accessed by the servers while locked, and the virtual machine is unable to power on.

    These virtual machine files are locked during runtime:
    • VMNAME.vswp
    • DISKNAME-flat.vmdk
    • DISKNAME-ITERATION-delta.vmdk
    • VMNAME.vmx
    • VMNAME.vmxf
    • vmware.log
    Initial quick test
    To run your critical virtual machine running:
    1. Migrate the virtual machine to the host and attempt to power on.
    2. If unsuccessful, continue to attempt a power on of the virtual machine on other hosts in the cluster.

      When you hit the host holding the file locks, the virtual machine should power on as the file locks in place are valid.

    3. If you still cannot power on the virtual machine continue with the steps below to investigate in more detail.
    To identify and release the lock on the files, perform these relevant steps for your version of ESXi.

    ESXi troubleshooting steps

    Identifying the locked file
     
    To identify the locked file, attempt to power on the virtual machine. During the power on process, an error may display or be written to the virtual machine's logs. The error and the log entry identify the virtual machine and files:
    1. Where applicable, open and connect the vSphere or VMware Infrastructure (VI) Client to the respective ESXi host, VirtualCenter Server, or the vCenter Server host name or IP address.
    2. Locate the affected virtual machine, and attempt to power it on.
    3. Open a remote console window for the virtual machine.
    4. If the virtual machine is unable to power on, an error on the remote console screen displays with the name of the affected file.

      Note: If an error does not display, proceed to these steps to review the vmware.log file of the virtual machine:

      1. Log in as root to the ESXi host using an SSH client.
      2. Confirm that the virtual machine is registered on the server and obtain the full path to the virtual machine by running this command:

        # vim-cmd vmsvc/getallvms

        The output returns a list of the virtual machines registered to the ESXi host. Each line contains the datastore and location within virtual machine's .vmx file.

        You see output similar to:

        [datastore] VMDIR/VMNAME.vmx

        Verify that the affected virtual machine appears in this list. If it is not listed, the virtual machine is not registered on this ESXi host. The host on which the virtual machine is registered typically holds the lock. Ensure that you are connected to the proper host before proceeding.

      3. Move to the virtual machine's directory:

        # cd /vmfs/volumes/datastore/VMDIR

      4. Use a text viewer to read the contents of the vmware.log file. At the end of the file, look for error messages that identify the affected file.
    Locating the lock and removing it
     
    A virtual machine can be moved between hosts, because of this the host where the virtual machine is currently registered may not be the host maintaining the file lock. The lock must be released by the ESX/ESXi host that owns the lock. This host is identified by the MAC address of the primary management vmkernel interface.

    Note: Locked files can also be caused by backup programs keeping a lock on the file while backing up the virtual machine. If there are any issues with the backup, it may result in the lock not being removed correctly. In some cases, you may need to disable your backup application or reboot the backup server to clear the hung backup.

    This lock can be maintained by the VMkernel for any hosts connected to the same storage.

    Note: ESXi does not use a separate Service Console Operating System. This reduces the amount of lock troubleshooting to just the VMkernel.

    For example, Console OS troubleshooting methods such as using the lsof utility are not applicable to ESXi hosts.

    Start by identifying the server whose VMkernel may be locking the file.

    To identify the server:
    1. Report the MAC address of the lock holder by running this command (except on an NFS volume):

      # vmkfstools -D /vmfs/volumes/UUID/VMDIR/LOCKEDFILE.xxx

      Note: Run this command on all commonly locked virtual machine files (as listed at the start of the Solution section) to ensure that all locked files are identified.

    2. For servers prior to ESXi 4.1, this command writes the output of the command above to the system's logs. From ESXi 4.1, the output is also displayed on-screen. Included in this output is the MAC address of any host that is locking the .vmdk file. To locate this information, check /var/log/messages.

      Look for lines similar to:

      Hostname vmkernel: 17:00:38:46.977 cpu1:1033)Lock [type 10c00001 offset 13058048 v 20, hb offset 3499520
      Hostname vmkernel: gen 532, mode 1, owner xxxxxxxx-xxxxxxxx-xxxx- xxxxxxxxxxxx mtime xxxxxxxxxx]
      Hostname vmkernel: 17:00:38:46.977 cpu1:1033)Addr <4 136="" 2="">, gen 19, links 1, type reg, flags 0x0, uid 0, gid 0, mode 600
      Hostname vmkernel: 17:00:38:46.977 cpu1:1033)len 297795584, nb 142 tbz 0, zla 1, bs 2097152
      Hostname vmkernel: 17:00:38:46.977 cpu1:1033)FS3: 132:


      The second line (in bold) displays the MAC address after the word owner. In this example, the MAC address of the management vmkernel interface of the offending ESXi host is xx:xx:xx:xx:xx:xx. After logging in to the server, the process maintaining the lock can be analyzed.

      In versions of ESXi equal or greater than 4.0 U3 and 4.1 U1, there is a new field which can identify a read only or multi writer lock owner.

      You see an output similar to:

      [root@test-esx1 testvm]# vmkfstools -D test-000008-delta.vmdk
      Lock [type 10c00001 offset 45842432 v 33232, hb offset 4116480
      gen 2397, mode 2, owner 00000000-00000000-0000-
      000000000000mtime 5436998]<----- span="">---------MAC address of lock owner
      RO Owner[0] HB offset 3293184 xxxxxxxx-xxxxxxxx-xxx-xxxxxxxxxxxx
      <----------------------- span="">
      -------MAC address of read-only lock owner
      Addr <4 160="" 80="">, gen 33179, links 1, type reg, flags 0, uid 0, gid 0, mode 100600
      len 738242560, nb 353 tbz 0, cow 0, zla 3, bs 2097152


      • If the command vmkfstools -D test-000008-delta.vmdk does not return a a valid MAC address in the top field (returns all zeros ). Review the field below it, the RO Owner line below it to see which MAC address owns the read only/multi writer lock on the file. In the preceding example, the offending MAC address is: xx:xx:xx:xx:xx:xx.
      • In some cases, it is possible that it is a Service Console-based lock, an NFS lock or a lock generated by another system or product that can use or read VMFS file systems. The file is locked by a VMkernel child or cartel world and the offending host running the process/world must be rebooted to clear it.
      • After you have identified the host or backup tool (machine that owns the MAC) locking the file, power it off or stop the responsible service, then restart the management agents on the host running the virtual machine to release the lock.

    3. To determine if the MAC address corresponds to the host that you are currently logged in to, see Identifying the ESX Service Console MAC address (1001167). If it does not, you must establish a console or SSH connection to each host that has access to this virtual machine's files.
    4. When you have identified the host holding the lock, unregister the virtual machine from the host.

      Note: If you cannot find the virtual machine in the host inventory in vCenter Server, open a vSphere or VI Client connection direct to the ESXi host. Check for any entry in the inventory labelled Unknown VM. If found, remove the unknown virtual machine from the inventory.

    5. When successfully removed from the inventory, register the virtual machine on the host holding the lock and attempting to power it on. You may have to set DRS to manual ensuring the virtual machine powers up on the correct host.

      If the virtual machine still does not power on, complete these procedures while logged into the offending host.

      Note: If you have already identified a VMkernel lock on the file, skip the rest of the section and go to the Further troubleshooting steps section in this article.

    6. Check if the virtual machine still has a World ID assigned to it:

      For ESXi 4.x, run these commands on all ESXi hosts:

      # cd /tmp
      # vm-support -x


      You see output similar to:

      Available worlds to debug:
      wid=world_id name_of_VM_with_locked_file


      On the ESXi 4.x host where the virtual machine is still running, kill the virtual machine. This releases the lock on the file. To kill the virtual machine, run this command:

      # vm-support -X world_id

      Where the world_id is the World ID of the virtual machine with the locked file.

      Note: This command takes 5-10 minutes to complete. Answer No to Can I include a screenshot of the VM, and answer Yes to all subsequent questions.

      After stopping the process, you can power on the virtual machine or access the file/resource.

      For ESXi 5.x and later, the esxcli command-line utility can be used locally or remotely to display a list of the virtual machines which are currently running on the host.

      Obtain a list of all running virtual machines, identified by their World ID, Cartel ID, display name, and path to the .vmx configuration file using this command:

      # esxcli vm process list

      You see output similar to:

      VirtualMachineName
      World ID: 1268395
      Process ID: 0
      VMX Cartel ID: 1264298
      UUID: ab cd ef ...
      Display Name: VirtualMachineName
      Config File: /path/VirtualMachineName.vmx


      Two worlds are listed. The first world number (in this example, 1268395) is the Virtual Machine Monitor (VMM) for vCPU 0. The second world number (in this example, 1264298) is the virtual machine Cartel ID.

      On the ESXi 5.x and later host where the virtual machine is still running, kill the virtual machine. This releases the lock on the file. To kill the virtual machine, run this command:

      # esxcli vm process kill --type=soft --world-id=1268395

    7. In ESXi 4.1/5.x/6.x, to find the owner of the locked file of a virtual machine, run this command:

      # vmkvsitools lsof | grep Virtual_Machine_Name

      You see output similar to:

      11773 vmx 12 46 /vmfs/volumes/Datastore_Name/VirtualMachineName/ VirtualMachineName-flat.vmdk

      You can then run this command to obtain the PID of the process for the virtual machine:

      ps | grep Virtual_Machine_name

      You can kill the process with this command:

      kill -9 PID

      To generate a core dump after killing the running virtual machine (but hung and nonresponsive), use the command kill -6 PID or kill -11 PID.

      Note: In ESXi 4.1 ESXi 5.x and ESXi 6.x, you can use the k command in esxtop to send a signal to and kill a running virtual machine process. On the ESXi console, enter Tech Support mode and log in as root.
      1. Run the esxtop utility using the esxtop command.
      2. Press c to switch to the CPU resource utilization screen.
      3. Press Shift+f to display the list of fields.
      4. Press c to add the column for the Leader World ID.
      5. Identify the target virtual machine by its Name and Leader World ID (LWID).
      6. Press k.
      7. In the World to kill prompt, type in the Leader World ID from step 6 and press Enter.
      8. Wait 30 seconds and validate that the process is no longer listed.
    Determining if the file is being used by a running virtual machine

    If the file is being accessed by a running virtual machine, the lock cannot be usurped or removed. It is possible that the host holding the lock is running the virtual machine and has become unresponsive, or another running virtual machine has the disk incorrectly added to its configuration prior to power-on attempts.

    To determine if the virtual machine processes are running:
    1. Determine if the virtual machine is registered on the host, run this command as the root user:

      # vim-cmd vmsvc/getallvms


      Note: The output lists the vmid for each virtual machine registered. Record this information as it is required in the remainder of this process on the ESXi server.

    2. Assess the virtual machine's current state on the host, run this command:

      # vim-cmd vmsvc/power.getstate vmid


    3. To stop the virtual machine process, see Powering off an unresponsive virtual machine on an ESX host (1004340)


Content of this blog has been moved to GITHUB

Looking at current trends and to make my content more reachable to people, I am moving all the content of my blog https://tech-jockey.blogsp...